Draw Tools
The following tools are available when you're working with a vector layer. Most of these tools are used by selecting them from the toolbar then clicking and dragging in the working area of the main window - a few are used simply by clicking on them, and this is noted below. If you hold the mouse over a tool, a tooltip will appear with the name of the tool if you need a quick reminder. Also, most tools have a shortcut key that can be used to activate them. If a tool has such a shortcut, this will show up in the tooltip as well.
If a tool has the following symbol next to it: , then it can be used for animation - using the tool at different frames in the timeline will cause the object you adjust to change over time.
Select Points

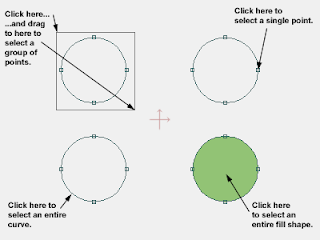
Many of the following tools work only on the currently selected points. This is the tool you use to select/de-select points. This tool can be used in a few different ways. The most basic way to select points is to drag a rectangle around them. Also, using this tool you can click on a single point to select it. The third method of selection is to click on a curve to select the entire curve. Finally, clicking on a filled-in area will select an entire object. Each of these selection methods is illustrated below:
Below is a short movie clip showing the different ways to select points using the Select Points tool.
http://img172.imageshack.us/my.php?image=addpointbc7.swf
Modifier keys: By holding thekey, you can extend a selection. Otherwise, you will always start a new selection when using this tool. Holding the key will prevent this tool from selecting curves or shapes when you click on them (sometimes when things get crowded it's hard not to click on a shape by accident). If you hold down the key, this tool will work in "lasso" style. (You can also activate lasso style selection by turning on "Lasso mode" in the tool options area.)
The selection commands in the Edit menu are also very useful for managing selections.
The currently selected points may be deleted by pressing theor keys।
Translate Points 
If a tool has the following symbol next to it:
, then it can be used for animation - using the tool at different frames in the timeline will cause the object you adjust to change over time.Select Points

Many of the following tools work only on the currently selected points. This is the tool you use to select/de-select points. This tool can be used in a few different ways. The most basic way to select points is to drag a rectangle around them. Also, using this tool you can click on a single point to select it. The third method of selection is to click on a curve to select the entire curve. Finally, clicking on a filled-in area will select an entire object. Each of these selection methods is illustrated below:

Below is a short movie clip showing the different ways to select points using the Select Points tool.
http://img172.imageshack.us/my.php?image=addpointbc7.swf
Modifier keys: By holding the
The selection commands in the Edit menu are also very useful for managing selections.
The currently selected points may be deleted by pressing the
Translate Points The Translate Points tool is used to move a group of selected points. It operates only on the currently selected points, unless fewer than two points are selected - then it operates on the nearest point to where you clicked.
It's important to note that this tool, like most of the Moho drawing tools, modifies points, not curves। If you select all the points in an object and use this tool, the entire object will move. However, if you only select some of the points, then you'll end up distorting the object (which can be very useful). In the pictures below, the selected points are highlighted in red. Notice the effect of using the Translate Points tool on these points.
It's important to note that this tool, like most of the Moho drawing tools, modifies points, not curves। If you select all the points in an object and use this tool, the entire object will move. However, if you only select some of the points, then you'll end up distorting the object (which can be very useful). In the pictures below, the selected points are highlighted in red. Notice the effect of using the Translate Points tool on these points.


Holding the key while using the Translate Points tool will constrain the selected points to only move vertically or horizontally.
The Translate Points tool can also be used in conjunction with Moho's welding feature. To weld two points together, use the Translate Points tool to drag one point on top of another (you must drag just one point to weld, not a group of points). While dragging the first point on top of the second, press the spacebar to weld them together into one point.
If the "Auto-weld" option is turned on in the tool options area, Moho can automatically weld points for you। Only the endpoint of a curve can be automatically welded। To automatically weld the endpoint of a curve, just drag it on top of another point and let go of the mouse.
Nudging: When this tool is active, you can "nudge" the selected point(s) by small increments by holding down the key and pressing the arrow keys. Hold down in addition to to nudge the point(s) by a greater increment।
 Scale Points
The Scale Points tool operates on the currently selected group of points. Two or more points must be selected to use this tool. When this tool is active, a red box will appear around the currently selected group of points. The handles around the edges of this box allow you to resize the points. Drag a corner handle in and out to scale the points while maintaining their proportions. Drag one of the side handles to change the horizontal scale, or the top or bottom handle to change the vertical scale. If you hold the
 Rotate Points
The Rotate Points tool also operates on the currently selected group of points. Two or more points must be selected to use this tool. Click near the outer boundary of the selected group of points. Next, drag the mouse in a circle around the selection to rotate the points. Holding the
Add Point 
The Add Point tool is what you use to draw most curves in Moho। Just click and drag in the working area of the main window to create a new curve segment. There are four variations to using the Add Point tool - they differ in where the original click takes place. The first way to use this tool is to click in empty space and drag - this will start a new curve. The second technique is to click on the end of an existing curve to add another segment to that curve. Third, click on a curve segment to add a point there, then drag it to the final desired position. Finally, click on a curve midpoint to add a new branching curve that is welded to the existing point. Each of these uses of the Add Point tool is shown below.

The Add Point tool is what you use to draw most curves in Moho। Just click and drag in the working area of the main window to create a new curve segment. There are four variations to using the Add Point tool - they differ in where the original click takes place. The first way to use this tool is to click in empty space and drag - this will start a new curve. The second technique is to click on the end of an existing curve to add another segment to that curve. Third, click on a curve segment to add a point there, then drag it to the final desired position. Finally, click on a curve midpoint to add a new branching curve that is welded to the existing point. Each of these uses of the Add Point tool is shown below.

The Add Point tool can also be used to weld two points। Click and drag in one of the ways described above to add a new point. Drag the new point on top of an existing point, and press the spacebar before releasing the mouse. An example is shown below. (This works just like the Translate Points tool, above. Read about that tool for more details on welding.)

To prevent the Add Point tool from adding on to an existing curve regardless of where you click, hold the key to force the tool to start a new line segment.
Delete Edge 
It's easy to delete points - just select them and press backspace or delete। However, sometimes you may want keep two points, but break the curve connecting them. To do this, use the Delete Edge tool. Just use it to click on the curve segment you want to delete and it will disappear. Note: If the edge you delete makes up part of the outline of a fill shape, that shape will also be deleted.

It's easy to delete points - just select them and press backspace or delete। However, sometimes you may want keep two points, but break the curve connecting them. To do this, use the Delete Edge tool. Just use it to click on the curve segment you want to delete and it will disappear. Note: If the edge you delete makes up part of the outline of a fill shape, that shape will also be deleted.
Curvature

This tool works on the currently selected points, or on the nearest point if less than two points are selected। It adjusts the level of smoothness of the curves passing through the selected points. Drag to the left to make the curves less smooth, and drag to the right to make the curves rounder.
Magnet

The Magnet tool is similar to the Translate Points tool - it is used to move points around. However, instead of moving the selected points, it moves points based on the "strength" of the magnet. When you click with this tool, the region of strength is displayed. Any points within this region will move with your mouse, but the points closer to the center of the mouse click will move the most. (The radius of the magnet's strength region can be adjusted in the tool options area.)
This tool is most useful for artwork that has lots of points। For example, the Freehand tool can create curves with many points - the Magnet tool can then move them around smoothly. Imported Adobe Illustrator files and text objects can also be sources of many control points.
Freehand

The Freehand tool lets you draw complex shapes by just dragging the mouse around. You can adjust the sensitivity of the Freehand tool in the tool options area when this tool is active. In the "Freehand Options" popup there are two adjustment parameters for this tool. The first is the minimum distance between points when drawing a curve with the Freehand tool. This setting is changed in the text box labeled "Pixel tolerance".
The second adjustment tells Moho to simplify a freehand curve by removing unnecessary points. This is controlled in the text box labeled "Angle tolerance". Points that deviate from the curve by less than that angle will be automatically removed. To preserve every single point created by the Freehand tool, set the angle tolerance to 0.
After using the Freehand tool, you will often want to go back and use the Translate Points tool to modify the result, delete unnecessary points, and weld points together। If you have a drawing tablet, the Freehand tool can also use the pen pressure from your tablet to control the thickness of the lines you draw (Windows and Mac OS only).
Rectangle

The Rectangle tool is a shortcut for creating a rectangular shape. Just click and drag to draw a rectangle. Hold the
In the tool options area, there are two options that let you choose whether the rectangle should automatically have a fill and/or outline। The current fill and outline colors will be used for this. If you choose not to automatically fill/outline the rectangle, you can always do it yourself later.
Oval

The Oval tool is a shortcut for creating an oval shape. Just click and drag to draw an oval. Hold the
In the tool options area, there are two options that let you choose whether the oval should automatically have a fill and/or outline। The current fill and outline colors will be used for this. If you choose not to automatically fill/outline the oval, you can always do it yourself later.
Arrow
Click and drag to draw an arrow shape।
Shear Points X

This tool works on a group of two or more selected points। Click and drag to shear, or slant the group of points to the left or right.
Shear Points Y

The Shear Points Y tool works exactly like the Shear Points X tool, except that it slants a selected group of points vertically instead of horizontally।
Perspective Points H

Click and drag side-to-side to add horizontal perspective to the selected group of points। Although Moho is not a 3D program, the effect of this tool is similar to rotating the points around a vertical pivot, so that one half of the group rotates into the screen and the other half out of the screen. If you want to do a true 3D rotation, you should use the Rotate Layer Y tool to apply true 3D perspective to a layer.
Perspective Points V

This tool works exactly like the Perspective Points H tool, except that it adds a vertical perspective instead of a horizontal perspective to the selected group of points।
Bend Points H

Drag your mouse up and down to bend the selected group of points up and down। For best results, the selected group of points should be wider than it is tall.
Bend Points V

Drag your mouse side to side to bend the selected group of points side to side। For best results, the selected group of points should be taller than it is wide.
Noise

The Noise tool works on a group of selected points। Click and drag to move the points around in random directions. This tool can be used for example when you want to duplicate an object using Copy and Paste, but you don't want the new object to look exactly like the original. Just use this tool to distort it a little bit.
Vector Modifiers
The following buttons appear in the toolbar as well, but work a little differently। Instead of selecting one of these to use in the working area, just click one of these buttons to modify the currently selected points.
Peak

Click this button to turn smooth curves into sharp corners। It affects all curves that pass through currently selected points. At these selected points, the curves will change from smoothly bending to sharp corners. (The Rectangle tool, for example, creates curves with this setting already turned on.)
Smooth
This button has the opposite effect of the Peak button above। It converts sharp corners into smooth curves.
Flip Points Horizontally
Click this button to flip a selected group of points horizontally।
Flip Points Vertically
Click this button to flip a selected group of points vertically.
Click this button to flip a selected group of points vertically.


Comments
Post a Comment